pic0rick !
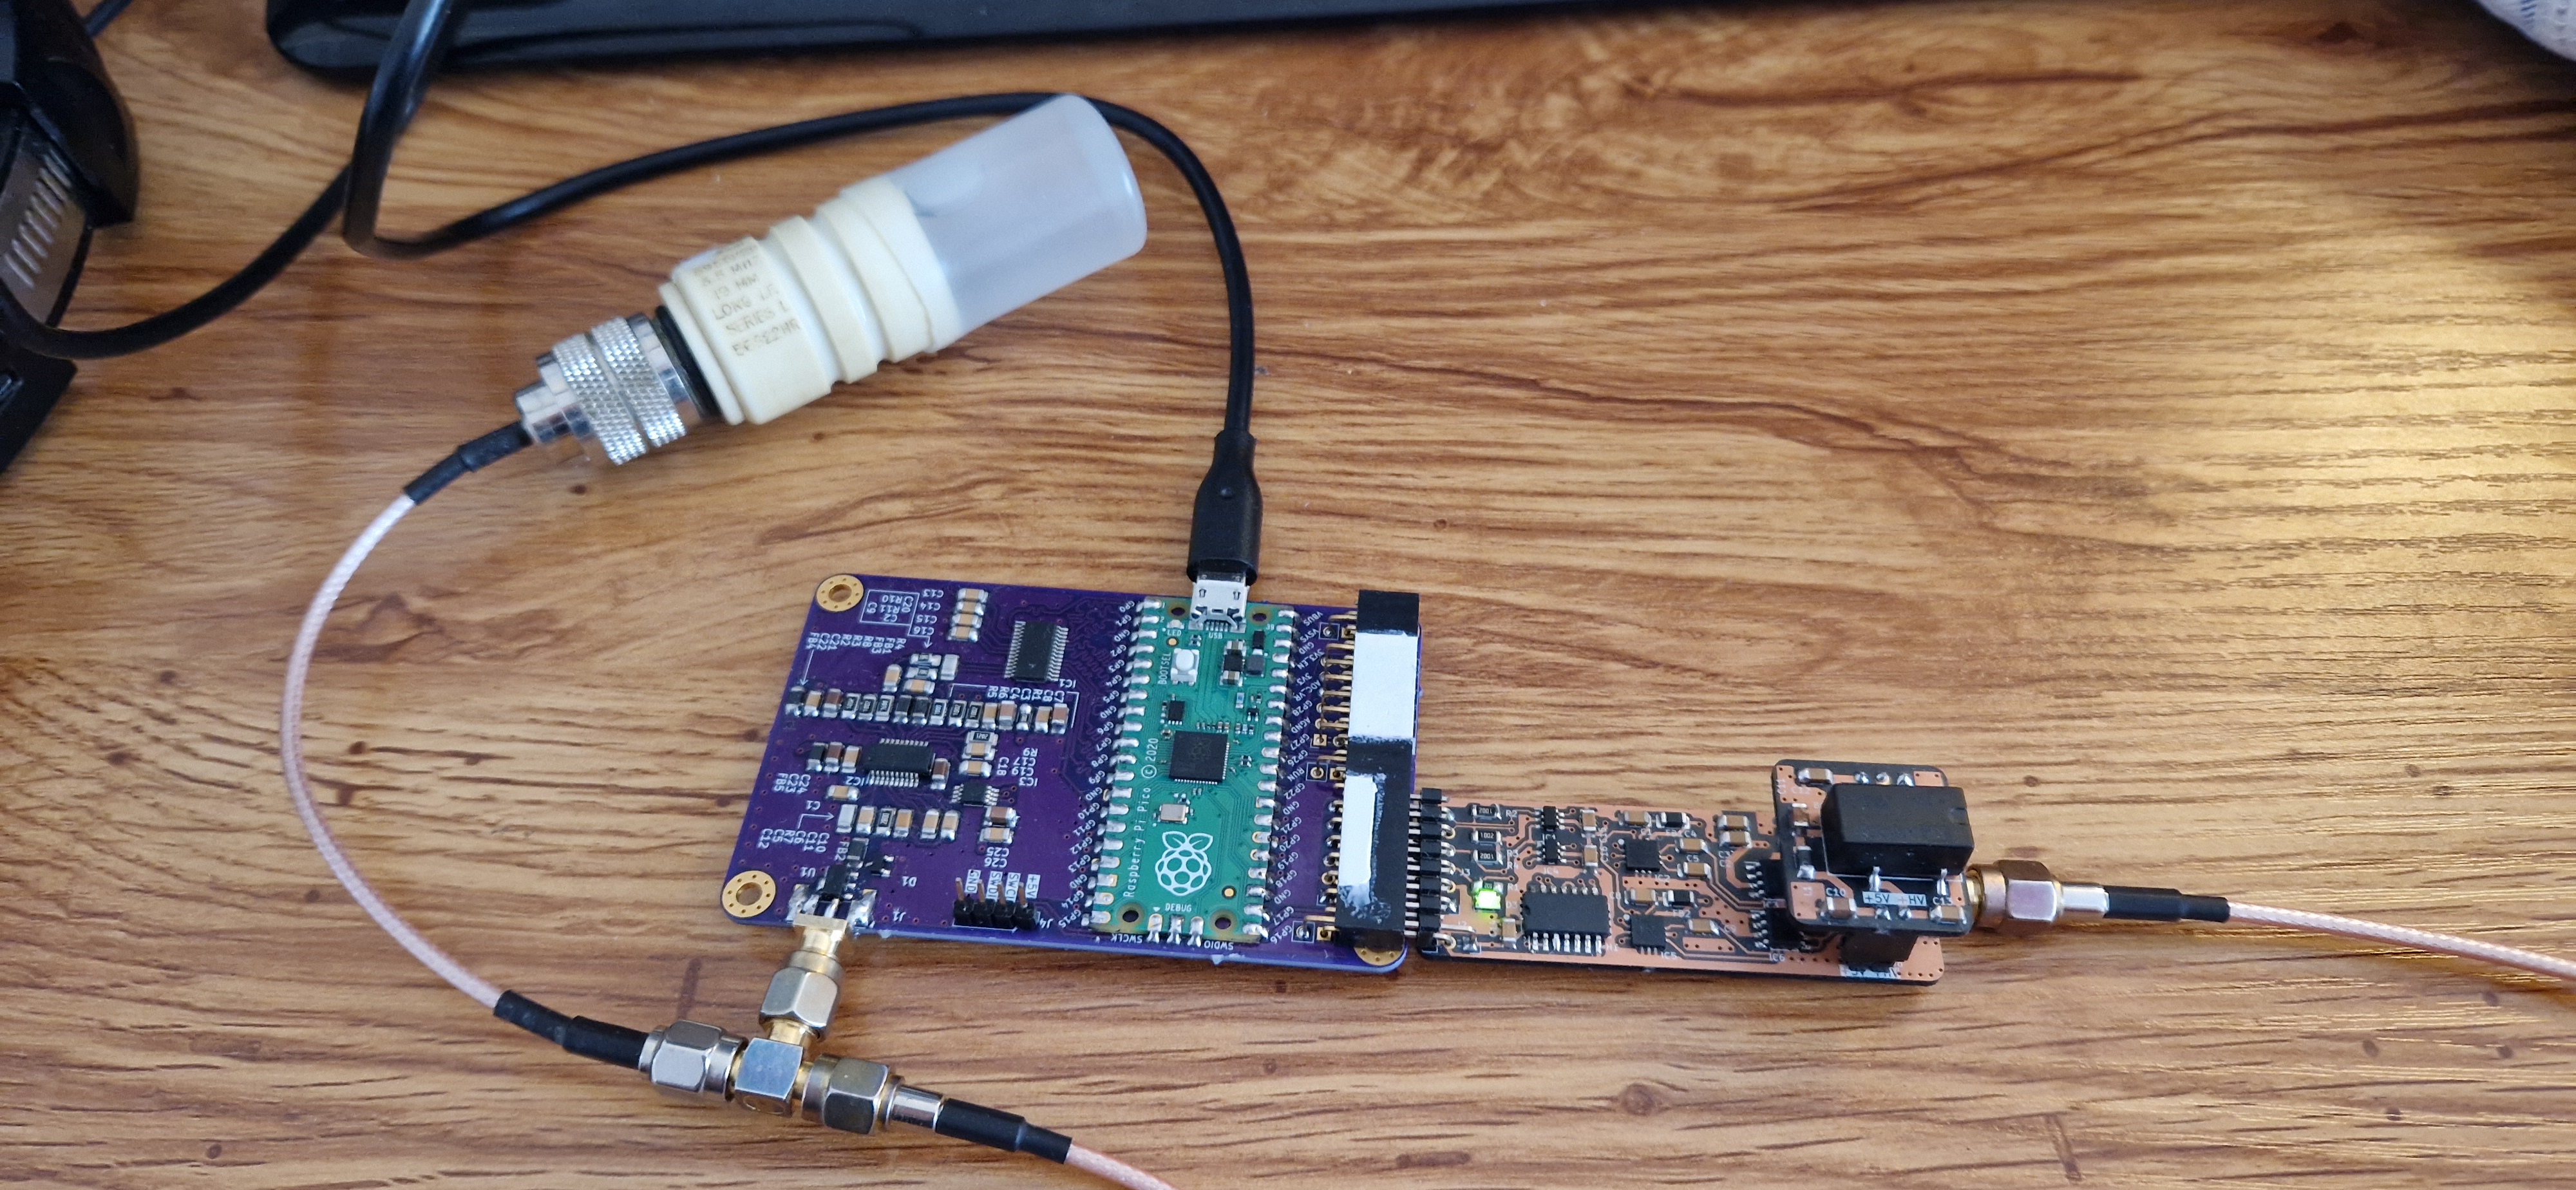
A pr2040 ultrasound pulse echo device

Building an Ultrasound Pulse Echo Device with Raspberry Pi Pico (RP2040) and PMODs: A DIY Guide
Ultrasound technology is a fascinating tech, widely used in medical imaging, non-destructive testing, and a range of other applications. Traditionally, the domain of ultrasound systems has been the preserve of specialized and often costly equipment. However, with the advent of powerful yet affordable microcontroller boards like the Raspberry Pi Pico, based on the RP2040 chip, enthusiasts and hobbyists can now venture into building their own ultrasound devices.
We explored how to create an ultrasound pulse echo device leveraging the Raspberry Pi Pico’s capabilities and PMODs for enhanced modularity.
Introduction to Ultrasound Pulse Echo Devices
Ultrasound pulse echo devices work by emitting high-frequency sound waves into a medium. When these waves encounter a boundary between different materials (like fluid and soft tissue in medical imaging), some of the sound waves are reflected back to the device. By measuring the time it takes for the echoes to return, the device can determine the distance to the boundary, creating a visual representation of the internal structure of the object under examination.
Why Raspberry Pi Pico?
The Raspberry Pi Pico, built around the RP2040 microcontroller, offers a dual-core ARM Cortex-M0+ processor with flexible digital interfaces, making it an ideal candidate for ultrasound projects. Its low cost, small size, and significant processing power, combined with extensive GPIO pins, provide a perfect base for building a customizable and compact ultrasound device.. and I’ve not mentioned the PIO yet.

Modular Design with PMODs
PMODs (Peripheral Modules) are small I/O interface boards that offer a standardized way to add capabilities to microcontroller boards. For this project, PMODs are used to enhance the device’s modularity, allowing for easy swapping of different pulsers and high-voltage sources, essential for generating and sending ultrasound waves.
Furthermore, PMODs can accommodate additional extensions such as VGA output for displaying the ultrasound images or a PSRAM module for extended data storage.
Building the Device
Step 1: Setting Up the Raspberry Pi Pico
Start by setting up your Raspberry Pi Pico with the necessary software and libraries. The Pico is programmable in C/C++ and MicroPython, but for this project, C/C++ is recommended for better performance and control over hardware resources.
Basic code is provided for an easy start =)
Step 2: Assembling the Ultrasound Pulser
The ultrasound pulser is one of the core functions of the device, responsible for generating the high-frequency sound waves. Use a PMOD compatible with your chosen pulser module to connect it to the Pico. Ensure the pulser can operate within the safe voltage and current limits of the Pico and the PMOD.
Step 3: Adding High Voltage Source
Ultrasound transducers typically require high voltages to operate effectively. A high-voltage extension board to the pulser can be used to safely interface a high-voltage source with the Pico, ensuring that the voltage levels are compatible and do not damage the microcontroller.
Step 4: Implementing Echo Detection
For echo detection, we connect the transducer to the ultrasound receiver. The received echoes need to be amplified (with a TGC) and processed (with a fast ADC) to measure the time delay, which works well with the PIOs.
Step 5: Extensions and Output
To visualize the acquisitions images, you can add a VGA output through a PMOD. This will allow you to connect a standard monitor to display the results. Usual transfer to the PC through (for the moment) an UART.
Alternatively, tor additional memory, especially for high-resolution imaging or longer echo delay times, a PSRAM PMOD can be plugged in.
Software Considerations
The software for this project will need to handle the timing of pulse emissions, capture and processing of echo signals, and the generation of images or distance measurements.
Libraries and examples for interfacing with PMODs and handling VGA output can significantly accelerate development - and it’s work in progress =)
Safety and Testing
Usual disclaimer : Always prioritize safety, especially when dealing with high voltages. Begin testing with non-biological materials and proceed with caution. Ensure all components are securely connected and that the high-voltage source is handled with care.
So…
Building an ultrasound pulse echo device with a Raspberry Pi Pico and PMODs is an exciting project that demonstrates the power and versatility of modern microcontrollers. This DIY approach is great to build a deeper understanding of ultrasound technology but also opens the door to custom applications and innovations in this fascinating field.
And because it’s open source, whether for educational purposes, hobby projects, or preliminary research, this guide offers a solid foundation for developing your own ultrasound imaging system.
Officially published! It lives on Zenodo, DOI:10.5281/zenodo.10968503 .